This guide is for Exchange 2003. We don’t currently have a guide for Exchange 2007, but a user has submitted the steps he took to get a working configuration. They are at the bottom of this page. Thanks to No-IP.com users Ernie and Francisco Thillet for the info!
Setting up Exchange 2003 to use Alternate-port SMTP is a quick and painless process. Three items need to be changed in the Default SMTP Virtual Server and then the service must be fully restarted to complete the process.
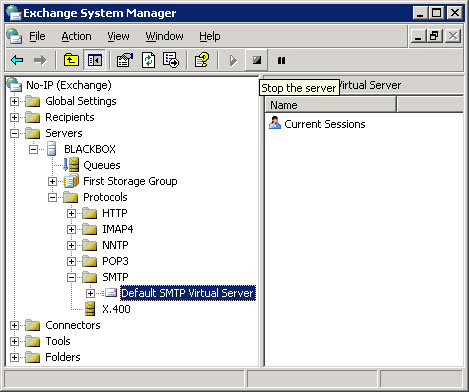
Open the “Properties” pane for the Default SMTP Virtual Server using the “Exchange Manager.”

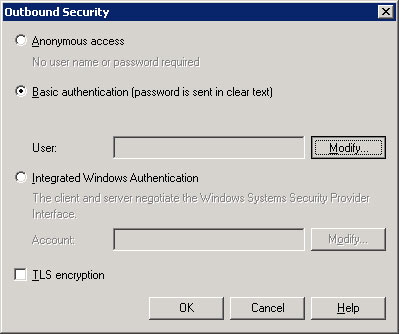
Go to the “Delivery” tab. There are three buttons at the bottom. We will need to make changes in the dialogs presented by each of these buttons. Start with “Outbound Security.”

On the Outbound Security dialog choose “Basic Authentication” and enter your username and password. This is the username that corresponds to your SMTP service and it looks like this: domain.com@noip-smtp. Be sure there are no extra spaces at the end of your username! The password is the password that you created within your No-IP account for Alternate-port SMTP.

Choose “OK” to close this dialog and return to the “Delivery” tab of the Default SMTP Virtual Server Properties pane. Click the next button, “Outbound Connections.”
On the “Outbound Connections” dialog change the TCP port to 3325.

Choose “OK” to close this dialog and return to the “Delivery” tab of the Default SMTP Virtual Server Properties pane. Click the next button, “Advanced.”
On the “Advanced Delivery” dialog change the “Smart Host” to smtp-auth.no-ip.com.
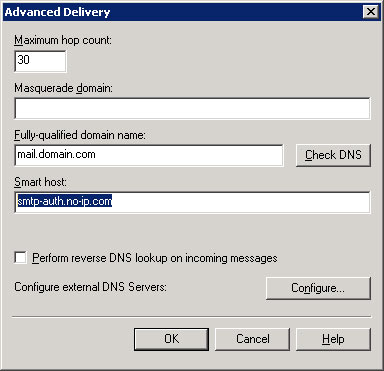
Choose “OK” to close this dialog and return to the “Delivery” tab of the Default SMTP Virtual Server Properties panel. Choose “OK” to close the properties pane.
Configuration is complete!
Note: The service needs to be restarted in order for the changes to take effect. Stop the service and wait a little for it to shutdown completely. Then start it back up.
If you’re not using a separate SMTP Connector on your Exchange server, you’re done! Send a test email and watch your logs to see that it was delivered properly.
Note: If you’re using an SMTP Connector with your Exchange server, you’ll have to perform the following procedure as well.
Open the “Properties” pane for the SMTP Connector using the “Exchange Manager.”

On the “General” tab, select the “Forward all mail through this connector to the following smart hosts” button and fill in smtp-auth.no-ip.com.

Next, go to the “Advanced” tab.

Once on the “Advanced” tab, click on the button marked “Outbound Security,“ select “Basic authentication” and then click on the button marked “Modify.”
In the resulting “Outbound Connection Credentials” box, enter your username and password. This is the username that corresponds to your SMTP service and it looks like this: domain.com@noip-smtp. Be sure there are no extra spaces at the end of your username! The password is the same password that you created on the No-IP website for Alternate-port SMTP.

Click on the “OK” button in the “Outbound Connection” then again in the “Outbound Security” and the “SMTP Connector” dialog boxes. Your configuration is now complete.
Exchange 2007
These instructions have not been tested but have been reported to work.
- Open up EMC (Exchange Management Console).
- Expand “Organization Configuration,” click on “Hub Transport,” then click on the “Send Connector” tab.
- Right click and create a new connector and give the name of the connector, then click “Next.”
- Click “Add for Address Space” and use the internal address or * for all, then click “Next.”
- Under “Network Settings” click on the radio button for “Route mail through the following smart host” and put smtp-auth.no-ip.com then click “Next.”
- Next is Authentication. Click on “Basic Authentication” and put in a username and password, then click “Next.”
- Lastly, find the source server, then click “Next.”
- Click on “New,” then finish and restart your services.
- Important: Open an Exchange Management Shell and type the following to set the port, (Start -> Programs -> Microsoft Exchange Server 2007 => “Exchange Management Shell”) replacing SENDCONNECTORNAME with the name you gave the send connector in step 3.
Set-SendConnector -Identity "SENDCONNECTORNAME" -port 3325