This guide will walk you through how to install the DUC (Dynamic Update Client) for Windows 4.x and explain the additional Enhanced preference settings that are available.
Note: You do not need to use the DUC if you’ve already configured DDNS in a router, DVR, camera, or other device. If you have multiple update clients updating the same hostname the service will not work properly. An update client is a device with DDNS settings configured and enabled. Our DUC is also an update client. You can still set up connections to multiple devices but make sure that each specific hostname is not updated by more than one update client.
First go to https://www.no-ip.com/download and download the Windows version of the DUC.
For this guide, I used Save File

Next, open your downloads folder and double-click on the DUCsetup_v4_0_1.exe icon. After double clicking on the icon, choose to Run the installation process.
Read the License Agreement and, if you agree to the EULA and the TOS, click I Agree.
You will then be prompted to select where you wish to install the DUC. A default installation directory will be used and created unless directed to your preference. If you do not wish to use a different directory, click Install.
Once the installation has finished, the application should launch and ask you to enter in your No-IP.com account username and password. If you choose to not launch the program at the end of the installation process you will need to locate and launch the program at a later date. To find the DUC program, click on the Start button on your desktop, then All Programs, find the No-IP DUC folder, expand it and click the DUC icon.
Note: If you created a DDNS Key, you can use the DDNS Key Username and Password to login instead of your No-IP account credentials.
You will be prompted to login. Enter the credentials you used when you created your No-IP.com account.
When logging in for the first time, you will need to select the hostnames or group that you would like to be associated with this client. The hostname(s) you selected will be updated with the public IP address of the network that the DUC is currently installed on. You can edit this any time after you save the settings by clicking Edit Hosts on the DUC v4.x.

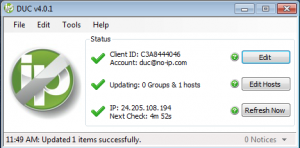
After you have selected your hostname(s) and saved your settings, you should see three green check marks. Three green check marks mean everything is working correctly and that you’ve successfully installed and configured the DUC. Your hostname will now be updated if your IP address changes.
Enhanced Preferences
You need to be sure your computer and DUC are running at all times if you want your hostname to always be updated. If you are not running the DUC and your IP address changes, No-IP.com will be unable to detect a change. To ensure that your DUC always starts, go to “File” in the DUC and click “Preferences” then check “Start this application automatically when this user logs on.”

If you check “Enable as a system service” this feature will allow you to run the DUC prior to logging into your actual Windows account. This is a useful feature for users who are accidentally logged out or restarts their PC.
Checking “Use Alternative IP detection method” can help if your IP is not being detected correctly or if it is detecting the wrong IP address. Along with “Use alternative IP detection method” is “Network Adapter”, it is best to leave this setting set to “Windows Default”, changing it can cause detection failing.

As shown here, the update interval for the DUC can be configured to your liking but it can not be set faster than 5 minutes. Additionally, Plus Managed DNS and Enhanced Dynamic DNS users can choose to create hostnames from the No-IP DUC interface by navigating to Edit Groups/Hosts.

A few things to note when using the Windows 4.x DUC:
- DUC listens on the following ports: 80, 8245, and 443. Please make sure they are opened outbound.
- If you have a firewall, you will need to make sure that the DUC program, dynupdate.no-ip.com, and/or 8.23.224.120 is whitelisted.
- If you run into any issues after installing the DUC, try fully uninstalling the program and re-installing after. This usually fixes any issues.
- If a re-install does not fix the issue, please uninstall the 4.x DUC and try an older version of the DUC that can be found here: http://noip.com/client/ducsetup.exe