No-IP Squared (Backup DNS) offers a great way to improve your DNS infrastructure, including over 100 locations in North America, Europe, Africa, Asia, and South America. If you maintain your own DNS server or your current DNS provider supports external DNS providers it’s pretty easy to get going. Follow these steps and you’ll be set up in no time.
In this article, we’ll use the BIND nameserver as an example. Roughly the same steps apply to other nameserver software or utilizing a third party DNS provider.
- Set your master nameserver IP address in MyNoIP
- Configure your master DNS to allow zone transfers to our provisioning server at 52.8.156.211
- Configure zone update notifications
- Confirm Firewall Settings
- Verify that zone transfers are working and receiving updates
- Add our nameservers to your zone
- Notify your domain registrar
Step 1: Configure your master nameserver in MyNoIP
Login to your No-IP.com account and go to “My Services” then “Backup DNS”, select “Modify” next to your domain. Here you will enter the IP address of your master server and click “Update”.

Step 2: Configure your master DNS server or DNS provider configuration to allow No-IP to receive zone transfers to our distribution server.
You will want to make sure that when your zone file changes, our system is able to receive a fresh copy using asynchronous or incremental zone transfers. Slave nameservers check for new zone changes based on the REFRESH SOA value for your zone. A secure nameserver will not allow zone transfers to the public. You’ll need to allow zone transfers to our provisioning system by allowing the IP 52.8.156.211. In BIND this will look like:
zone "snottyron.com" {
     allow-transfer { 52.8.156.211; };
};
Step 3: Configure Update Notifications
Since our provisioner, 52.8.156.211, is not a public-facing nameserver, you should also enable notify messages. Notify messages from your master to tell us when your zone has updated, instead of waiting for the refresh timer to expire. This speeds up the time it takes to publish your changes to the Internet. Our distribution server is not listed in the zone file, so you’ll need to tell us when your zone changes by using the DNS NOTIFY message.
Your BIND configuration will now look like this:
zone "snottyron.com" {

     ...

     allow-transfer {52.8.156.211;};

     notify yes;

     also-notify {52.8.156.211;};

     ...

};
Make sure you don’t have any firewall rules that would prevent us from communicating with your master server. You’ll need port 53 UDP and TCP open for 52.8.156.211.
Step 5: Verify the zone transfers work properly.
Now that you’ve configured zone transfers you should verify that the process is working before applying our nameserver to your zone. You can test this by incrementing the serial number in your master zone and verifying that our system has the new version of your zone.
Before you increment the serial number first check the current serial number (in this example it’s 159):
$dig @your_master_nameserver.example.com example.com SOA

example.com 86400 IN SOA Your_master_nameserver.example.com. hostmaster.example.com. 159 10800 1800 604800 1800
Edit your zone file and increment your serial number update on your master and reload the zone and make sure your master has the new version of the zone. In this example it should now be 160:
$dig @your_master_nameserver.example.com example.com SOA

example.com 86400 IN SOA Your_master_nameserver.example.com. hostmaster.example.com. 160 10800 1800 604800 1800
If zone transfers are properly configured you should now see an updated version of your zone on our system.
$dig @ns1.no-ip.com example.com SOA

example.com 86400 IN SOA Your_master_nameserver.example.com. hostmaster.example.com. 160 10800 1800 604800 1800
The serial numbers in our system should match the new serial number on your master. If it doesn’t match then something is not quite right. If the serial number on our system is not what you have then there may be an issue with your NOTIFY settings. If our system returns SERVFAIL or REFUSED that could suggest your allow-transfer or firewall settings are preventing us from fetching your zone file. You should review the steps above or if you still can’t quite get it, ask our support team.
Step 6: Publish our nameserver records to your zone. On your master, edit your zone file to include our nameservers in the nameserver delegation section and publish the update zone including our nameserver records in addition to yours.
$ORIGIN .

$TTL 86400  ; 1 day
example.com.      IN SOA ns1.exampe.com. hostmaster.example.com. (
               161 ; serial
               10800 ; refresh (3 hours)
               1800 ; retry (30 minutes)
               604800 ; expire (1 week)
               1800 ; minimum (30 minutes)
               )
               NS ns1.example.com.
               NS ns2.example.com.
               NS  ns1.no-ip.com.
               NS  ns2.no-ip.com.
               NS  ns3.no-ip.com.
               NS  ns4.no-ip.com.
               …
Your zone file will look like this (don’t forget to update the serial number!):
Step 7: Notify your domain registrar of the addition of No-IP’s nameservers
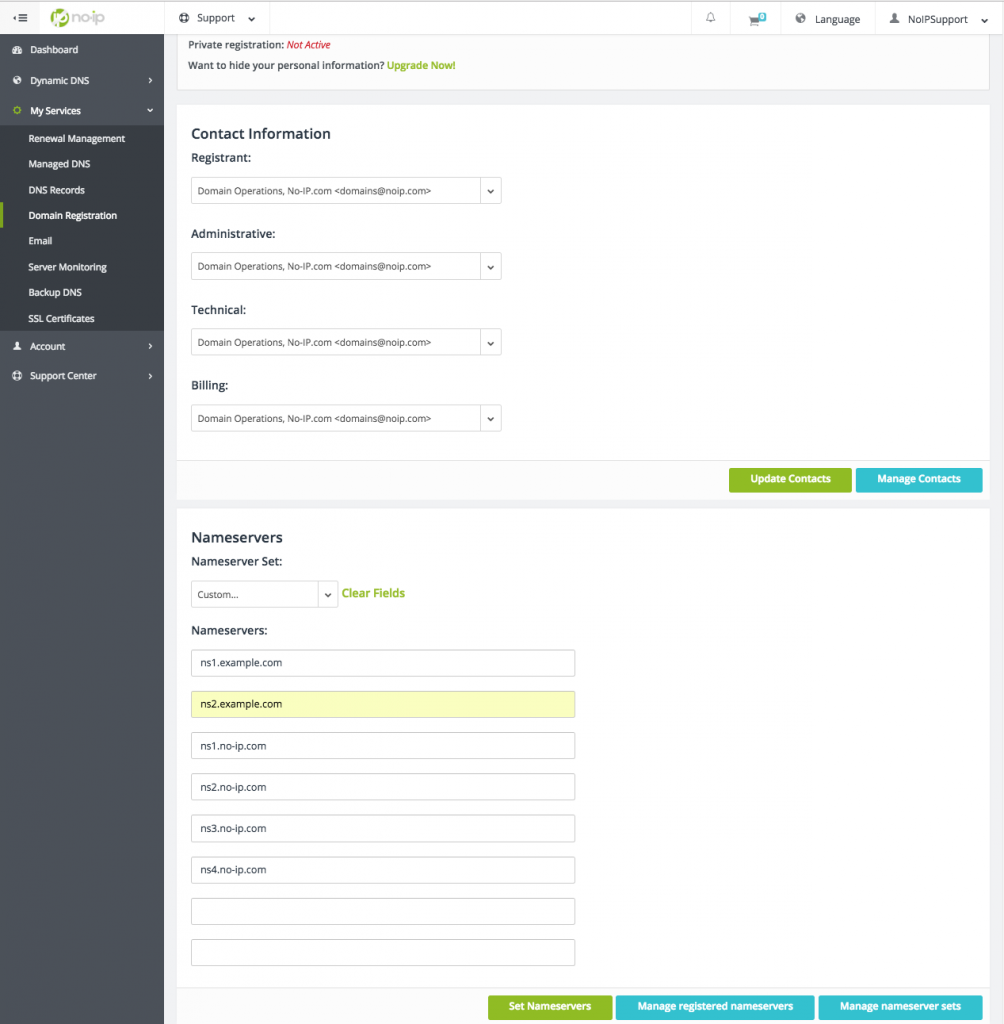
The last step is to tell the root servers where to find your zone. This is done at your registrar. If your domain registration is with No-IP, here is what you do. Login to your No-IP.com account and go to “My Services”, click “Domain Registration”, then “Configure” and add the following nameservers to your existing ones :
ns1.example.com ns2.example.com ns1.no-ip.com ns2.no-ip.com ns3.no-ip.com ns4.no-ip.com
Enjoy Peace of Mind:
You’ve just increased your DNS presence 10 fold. Just make sure you keep your email address current with No-IP so that you get important maintenance notifications regarding changes on our end that may require action on your part (i.e. rare event of IP address changes).
This example uses BIND. Very similar actions are needed for other servers such as NSD or Microsoft DNS server.
If you have any questions, please don’t hesitate to ask for help using our support system or by opening a support ticket.