This guide will walk you through the steps of port forwarding on the 2Wire 3801HGV Router.
Step 1: Open up your favorite browser and go to the router’s default gateway address. This is usually http://192.168.254.1 and typing that into the address bar in your browser should get you there. If not then consult the default gateway article.
Step 2: The login information is typically on a sticker somewhere on your router. If not, you may need to contact your Internet Service Provider.
Step 3: Once logged in, go to “Settings” then to “Firewall.”
Step 4: On the Firewall page, click “Applications, Pinholes and DMZ.”
Step 5: Select the device or computer you want to forward connections to.
Step 6: Choose “Allow Individual Applications.”
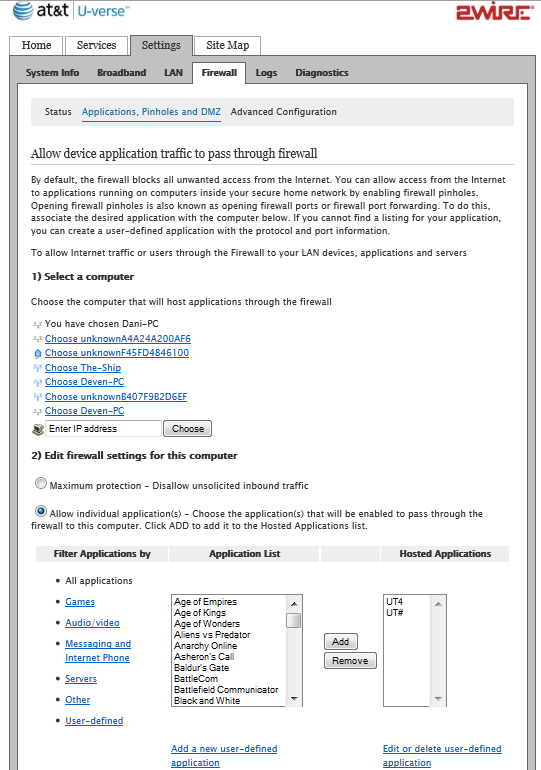
2 Wire Router Settings
Step 7: At the bottom of the page, click “Add a new user-defined application” and choose a Profile Name then check the TCP item.
Step 8: Enter the port you wish to open in the “Port From” field then again in the “To” field for a single open port.
Step 9: “Protocol Timeout” you may leave blank.
Step 10: “Map to Host Port” you may also leave blank.
Step 11: For “Application Type” you can choose the one that best matches your service or click “Add To List” to create your own.

Once you save the settings you should now be able to test your port at www.portchecktool.com. Please keep in mind your ISP (Internet Service Provider) may be blocking certain ports such as port 80,25 and 21. You can call and ask if they are. If you are still not able to see the ports, check your firewall software on your computer.