This guide will show how to configure Thunderbird 17.0.5 on Windows 7 to use No-IP’s POP/IMAP mail product. If you do not have Thunderbird already you can download it here.
Important Settings:
POP3 Server: mail.noip.com, port 110 or 995 with SSL enabled.
IMAP Server: mail.noip.com, port 143 or 993 with SSL enabled.
Outbound SMTP: mail.noip.com, port 587 or 465 with SSL enabled (requires authentication).
Username: Your complete email address, e.g. user@example.com.
Step 1: Launch your Thunderbird Mail Application in Windows. If it’s your first time launching this program you will be prompted for the new account information. You will also be prompted for system integration. With system integration you can decide how you would like the mail client to act.
If this is not the first time. Click “Create New Account”, then click on “Skip this and use my existing email”.

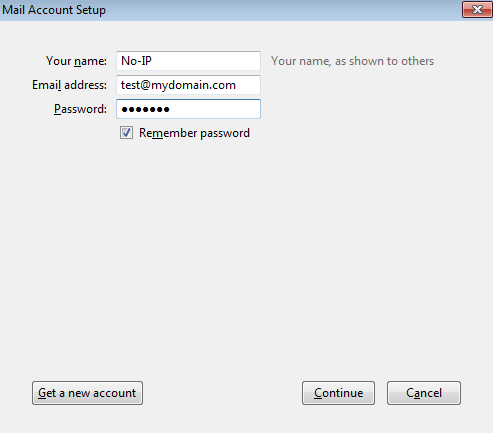
Step 2: The intro screen will ask for some information. The full name field is what will appear when you send email. The email address of course is the email address we will be pulling mail down for. Lastly, you will need to enter the password for this mail account, then click “Continue“. If your not sure about the password, you can reset this at www.noip.com once you login and click on the “Mail” tab along the green bar, then “Configure”, then “Modify”.
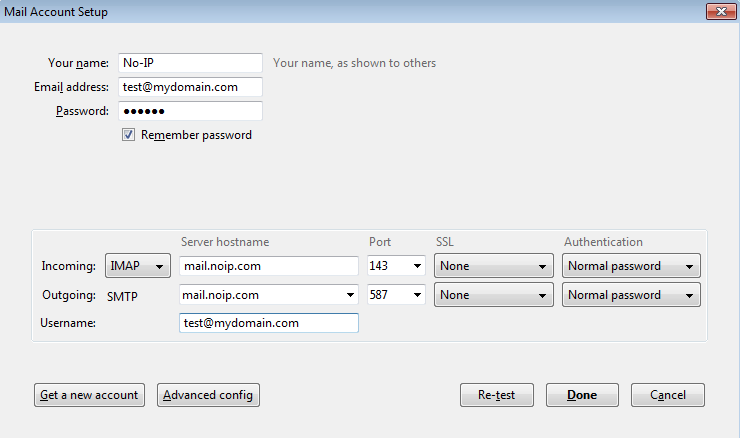
Step 3: The second screen will ask you for the server information, you can choose POP or IMAP from the drop down menu. No-IP recommends IMAP. Enter the incoming & outbound mail servers, mail.noip.com and enter in your full email address in the “Username” field.

Step 4: Click “Re-test” which will automatically fill in your account settings, then click “Done“.