For anyone who plays video games, you are aware of the advantages of running your own game server. Not to mention how cool it will make you among your friends. What you may not know is how easy it actually is. Follow these simple instructions and get started today!
Here are the steps to follow:
1. If you haven’t already, create and activate a No-IP account.
2. Add a hostname to your account if you have not done so yet. In order to create a hostname from inside your No-IP account, please navigate to DDNS & Remote Access > DNS Records > Create Hostname. You will then be prompted fill in the details of your new hostname.
3. Choose the Type. The default choice, DNS Host A, is usually the correct one.
4. Fill in the Host field with a name of your choosing. It can be anything you like. If you choose a name that’s already in use, an error will generate so you will need to try a different hostname. Since hostnames are unique per domain, you can try using the same hostname and just select a different domain from the domain field drop down box to see if that combination is available. Note: Certain domains are reserved for No-IP Enhanced customers only.
5. In the field marked IPv4 you should already see your current IP address. If you wish to set the IP address of the host to be somewhere other than your current location, you can enter that address now.
6. TTL (Time to live) is the length of time or hops may make before it’s discarded. Basically how fast your record is received. Leaving it on Auto will put you at the fastest time allowed for the record.
7. Optional: You can check Enable Dynamic DNS to create the hostname with a DDNS Key. You can create a hostname without it but it is recommend to set up Dynamic DNS.
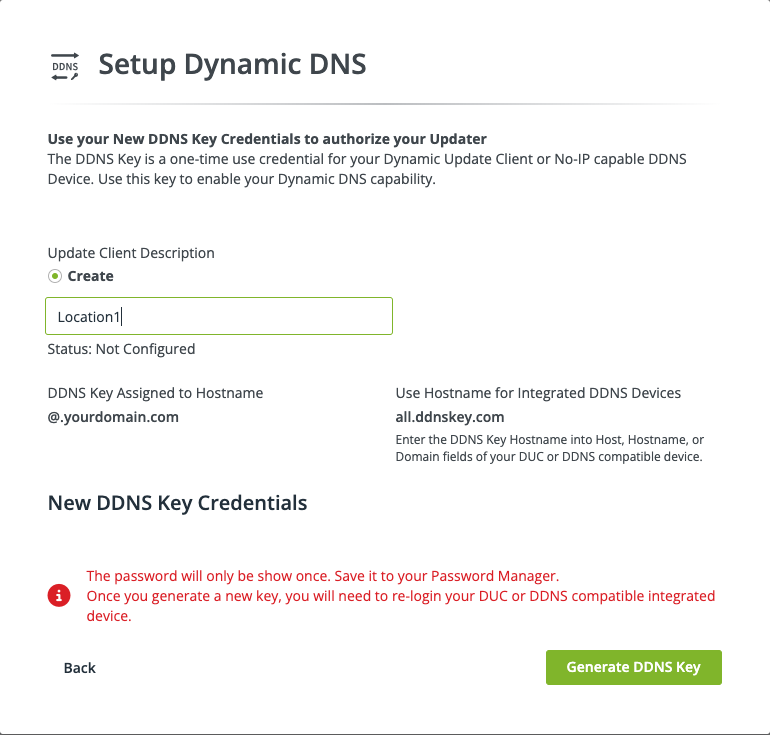
When Enable Dynamic DNS is selected during A record creation, you will be prompted with the Setup Dynamic DNS modal. Select the update client you plan to use, download a client if desired, then click Next.
Add an Update Client Description (Friendly Name) then click Generate DDNS Key.
You should now see your DDNS Key Username and DDNS Key Password. This is your only opportunity to copy or save the DDNS Key Password.
8. When you have filled in the information for your new hostname, simply click the Create button to save it.
9. Now you will want to set up an update client to provide our update servers the correct IP address of your network. An update client can be either your router if it supports Dynamic DNS with us, a Dynamic DNS capable device or by downloading our No-IP Dynamic Update Client. (If your ISP provides you with a static IP address, you can skip this step.) The configurations should be set as such (if applicable):
DDNS/Service Provider: No-IP
Username: Your DDNS Key Username / Email
Password: Your DDNS Key Password
Hostname/Domain: all.ddnskey.com
*Server/Server Address: dynupdate.no-ip.com
*Not every device will ask you for a server or server address. The service will still work without issue, if the device does not ask for it.
DDNS Key usernames and passwords are created individually for each hostname or group of hostnames. Please see step 7 to create one.
10. If you use a router to connect to the Internet and/or have a firewall in place on your computer, you will need to make sure that it is configured to direct the appropriate traffic from the Internet into the destination machine on your network. This is done using a router function called Port Forwarding. You can use any port or whatever is specified by the game software. Just be sure that the ports match at the firewall/router. You can visit PortForward.com for step-by-step guides on port forwarding for your specific router.
11. Next, verify that your router and firewall are set up correctly, you can visit the website at www.portchecktool.com to see if your port is open.
12. You’re done! As long as the port is visible and your hostname resolves back to your network you should be ready to have your friends join you online to play your favorite video game!
It is important to note that depending on which game you are playing, it will either ask for the hostname and port separately, or it will just ask for the host. You may need to have your friends connect as host.domain.com:portnumber

