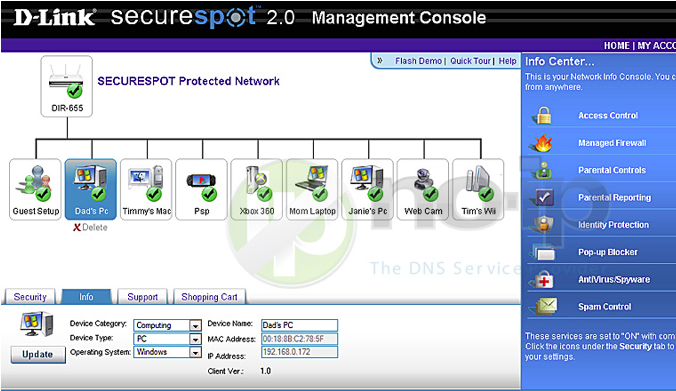
This guide will walk you through the steps of port forwarding on the D-Link DIR-655 with Secure Spot 2.0 Management Console.
Step 1: Login to your router through the provided software.
Step 2: Select a device and click “Info.” The field labeled “IP Address” contains your internal IP address, take a note of this address as you will need it later on in this guide.

Step 3: Go to the “Security” tab and then click “Firewall.” You might need to click an orange box that says “Click here to view the Router’s Firewall Options,” once here click on “Port Forwarding.”
Step 4: Choose a name for the service (small description eg. web, camera, xbox, etc.). For the IP Address, enter your internal IP address from “Step 2.” “TCP” and “UDP” are the traffic protocols on which ports you want to open and to use which traffic. In this case we will be using both “TCP” and “UDP” in those two fields. Add the port you would like open. Set the “Schedule” to “Always” and “Inbound Filter” to “Allow all.” Check “Enabled” then “Save.”
Note: Router will need to be rebooted (or power off/on) to apply changes.

Once you save the settings you should now be able to test your port at www.portchecktool.com. Please keep in mind your ISP (Internet Service Provider) can be blocking certain ports such as port 80, 25 and 21. You can call and ask if they are. If you are still not able to see the ports check your firewall and anti-virus software on your computer.
Here is an example. You have a webcam that has the IP address 192.168.1.100 and it runs on port 8080. You want to be able to access this camera from outside your network on port 8080. You would enter the below values into the port forwarding page.
- To IP Address = 192.168.1.100
- TCP = 8080
- UDP = 8080
- Save Settings
Then to view the camera you would use your No-IP host of “somehost.no-ip.com” like this: http://somehost.no-ip.com:8080 to reach the webcam.