When enabled, Two-Factor Authentication (2FA) increases your account’s security by requiring a second method of verification before you can login to No-IP.com’s website.
2FA Setup Instructions
Navigate to the Security page. Login to your No-IP account and click your username on the top right of the screen. In this menu, click Security.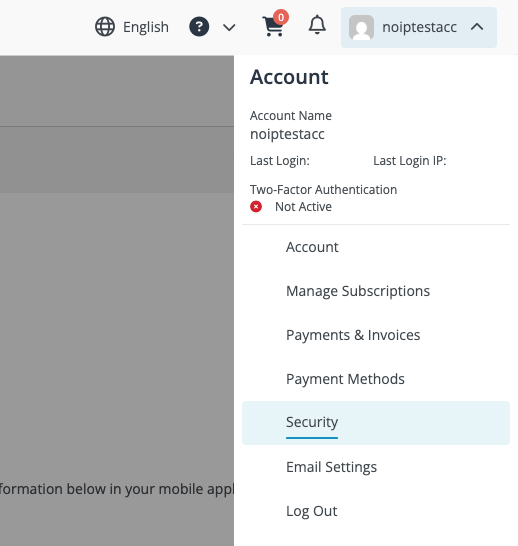 Download and install an authentication app. This article will be using 1Password. If you’d rather use a different app see our articles for Duo, LastPass or Authy. They’re all available on the Play Store for Android or the App Store for iOS.1Password is not a free application so we recommend you use this only if you already use 1Password. You can use Duo, Authy, or Lastpass to set up 2FA without a subscription.
Two-Factor Authentication Setup – Android
-
Open and unlock 1Password, select your No-IP login item, then tap Edit (The pencil icon). Or if you haven’t created one yet click the + icon on the categories tab.
-
Tap “Add new section”, then tap “Add new field” and choose One-Time Password from the list.
-
Tap the QR code icon to scan the QR code from your No-IP account. Make sure to give the application permission to use your camera.
-
Tap Save.
-
The Login item you set this up for should now have a one time password section with a 6 digit code and a timer. Add the 6 digit code to the security page in your No-IP account along with the password of your No-IP account and click enable. Two-Factor Authentication should now be enabled. Do not navigate away from this new page, see the Backup Codes section in this article.
-
First you should create a login item for No-IP within the 1Password program.
-
In Safari, tap the Page Settings button in the address bar (while at No-IP.com), then tap 1Password.
-
Select your login for No-IP to view the login item’s details.
-
Tap the QR code icon to scan the QR code from your No-IP account. Make sure to give the application permission to use your camera.
-
Tap Done.
-
The Login item you set this up for should now have a one time password section with a 6 digit code and a timer. Add the 6 digit code to the security page in your No-IP account along with the password of your No-IP account and click enable. Two-Factor Authentication should now be enabled. Do not navigate away from this new page, see the Backup Codes section in this article.