Dynamic DNS (DDNS) allows you to access devices, servers, and applications remotely, even when your public IP address changes.
What is Dynamic DNS?
Dynamic DNS or DDNS is a technology that automatically updates a domain name with a device’s current IP address. This is important for networks without a static IP address, to enable consistent remote access.
No-IP offers free Dynamic DNS services commonly used for smart home devices, security cameras, and web servers.
What You’ll Learn in This Guide
- What free Dynamic DNS does and why it’s the right choice
- How to setup free dynamic DNS with No-IP
- How to decide between using a router, device, or DUC for updates
- What to check if your hostname isn’t updating correctly
- How to secure and validate your Dynamic DNS setup
Getting Started with No-IP and Dynamic DNS
Before configuring Dynamic DNS, you’ll need to create a free No-IP account. This will allow you to run your servers or check your devices remotely at your home or business without a static IP address.
Create a Free Dynamic DNS Account
To get started, create a free No-IP account. During registration, you’ll be asked to provide basic account information and verify your email address.
Once your account is confirmed, you’ll be able to manage hostnames, generate DDNS Keys, and configure Dynamic DNS from the No-IP dashboard.
To create an account with No-IP simply click the Sign Up link at the top of the page, fill in the required fields on the new account form and click the Free Sign Up button.
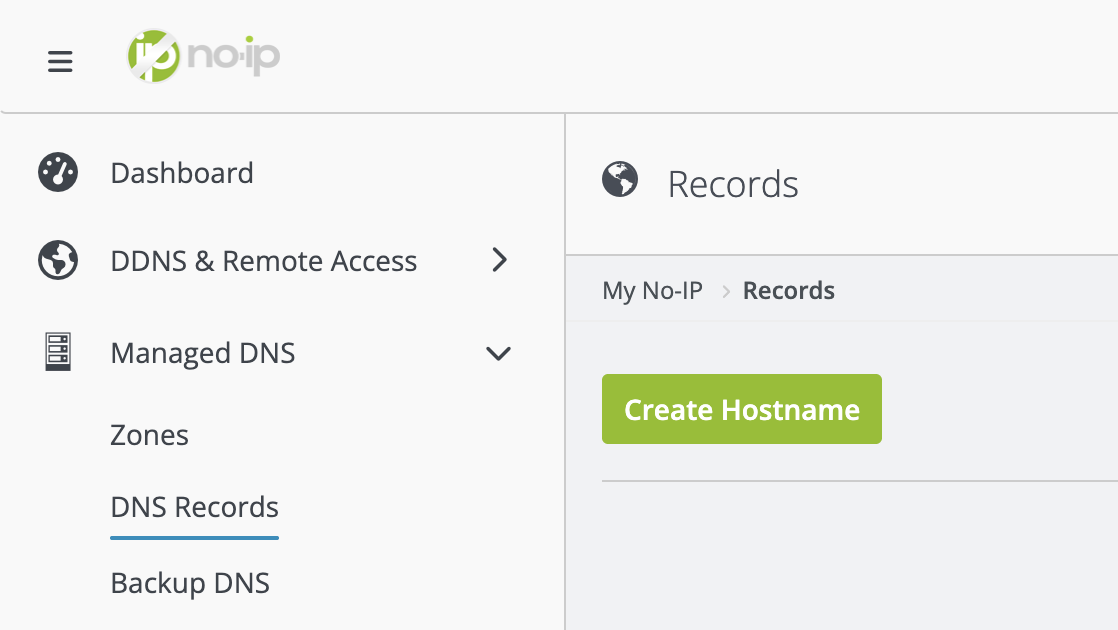
Add a Hostname to Your Account
If you didn’t create it upon registration, in order to add a hostname manually click on Managed DNS > DNS Records and then the green Create Hostname button.
This should open a box with the following options:
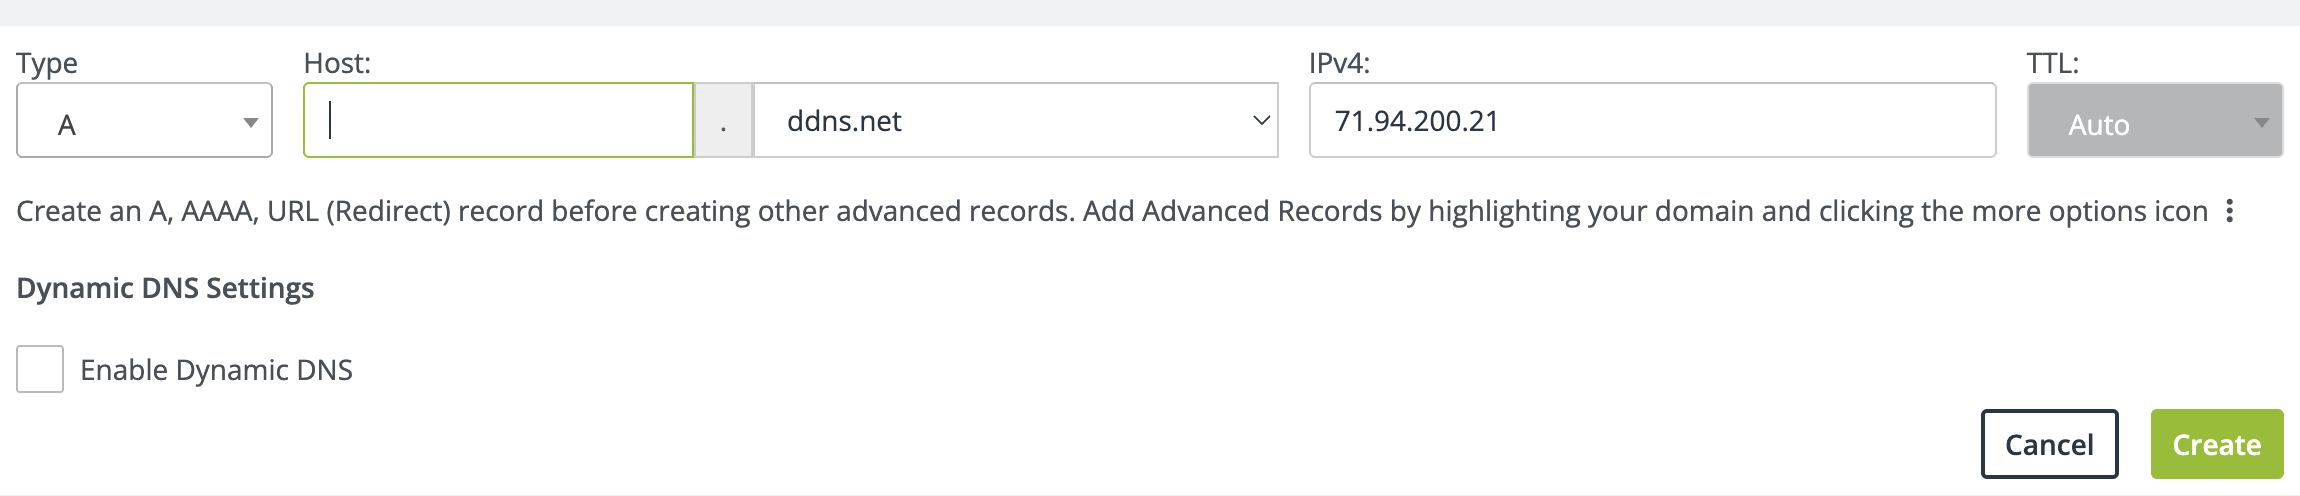
In this box, you will type in the desired hostname (e.g. mycamera or myserver) and then select the domain you would like to use from the drop-down menu. Leave the hostname as a Type “A” unless you need a specific record type. The IPv4 Address section should already be filled in with your current public IP address. If there is a different public IP address you would like to use, enter it now.
Finally, click on Enable Dynamic DNS checkbox then the Create button.
Dynamic DNS Setup Overview
Now that you have an account and hostname created, we have everything we need to start the process of configuring Dynamic DNS for your hostname. This is done by configuring an update client to send IP updates to your hostname from your network. An update client can be a device like a router, camera, or our DUC software running on a computer.
Choose an Update Client and Create a DDNS Key
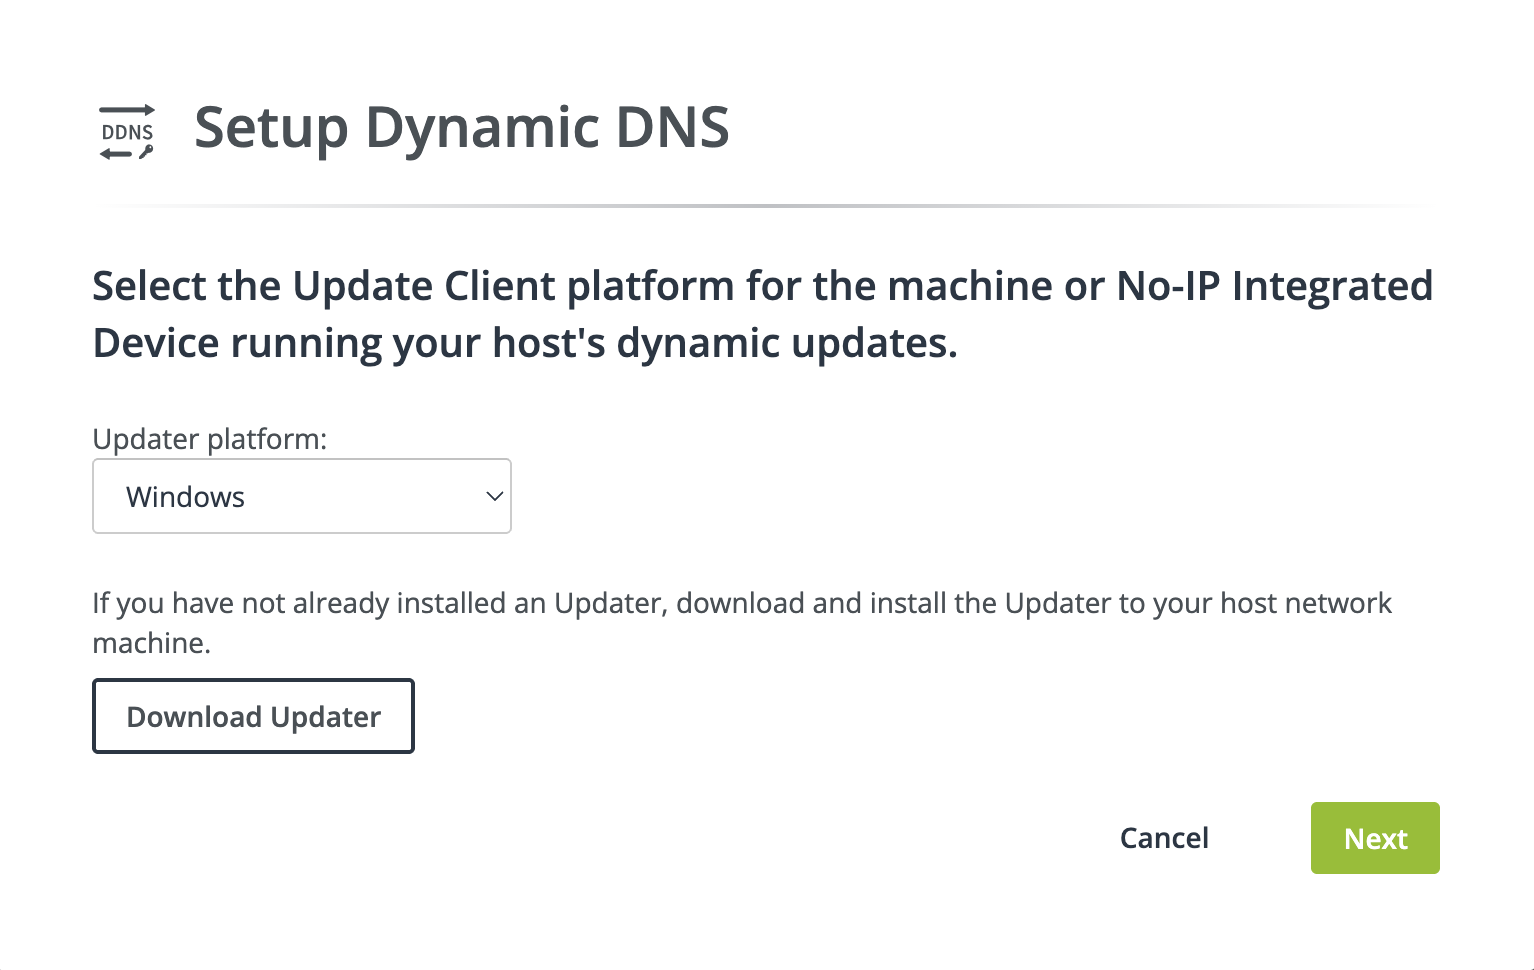
Upon creation of a hostname you will be prompted with the Setup Dynamic DNS modal. Select the update client you plan to use, download a client if desired, then click Next.
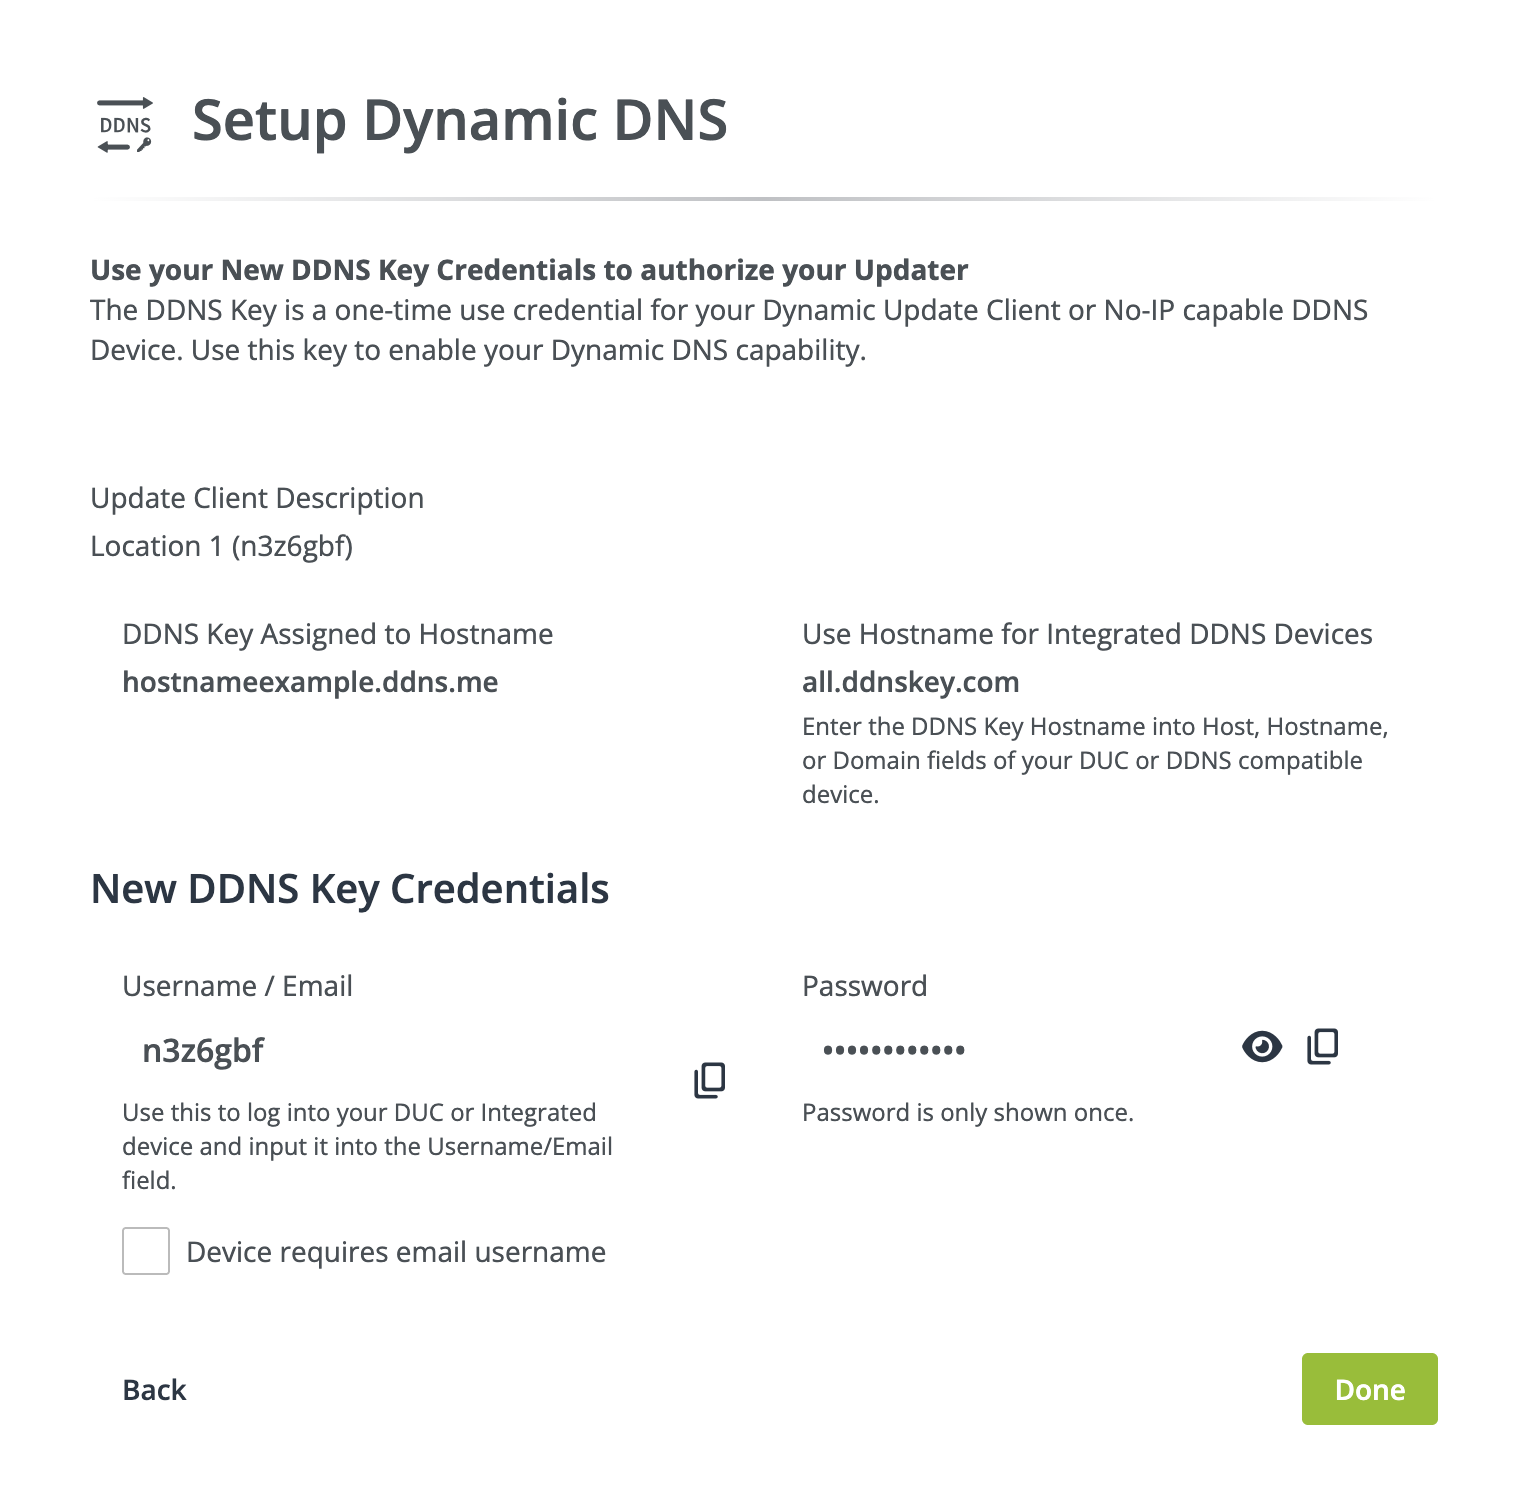
Add an Update Client Description (Friendly Name) then click Generate DDNS Key.
Check out our knowledge base article for more information on DDNS Keys
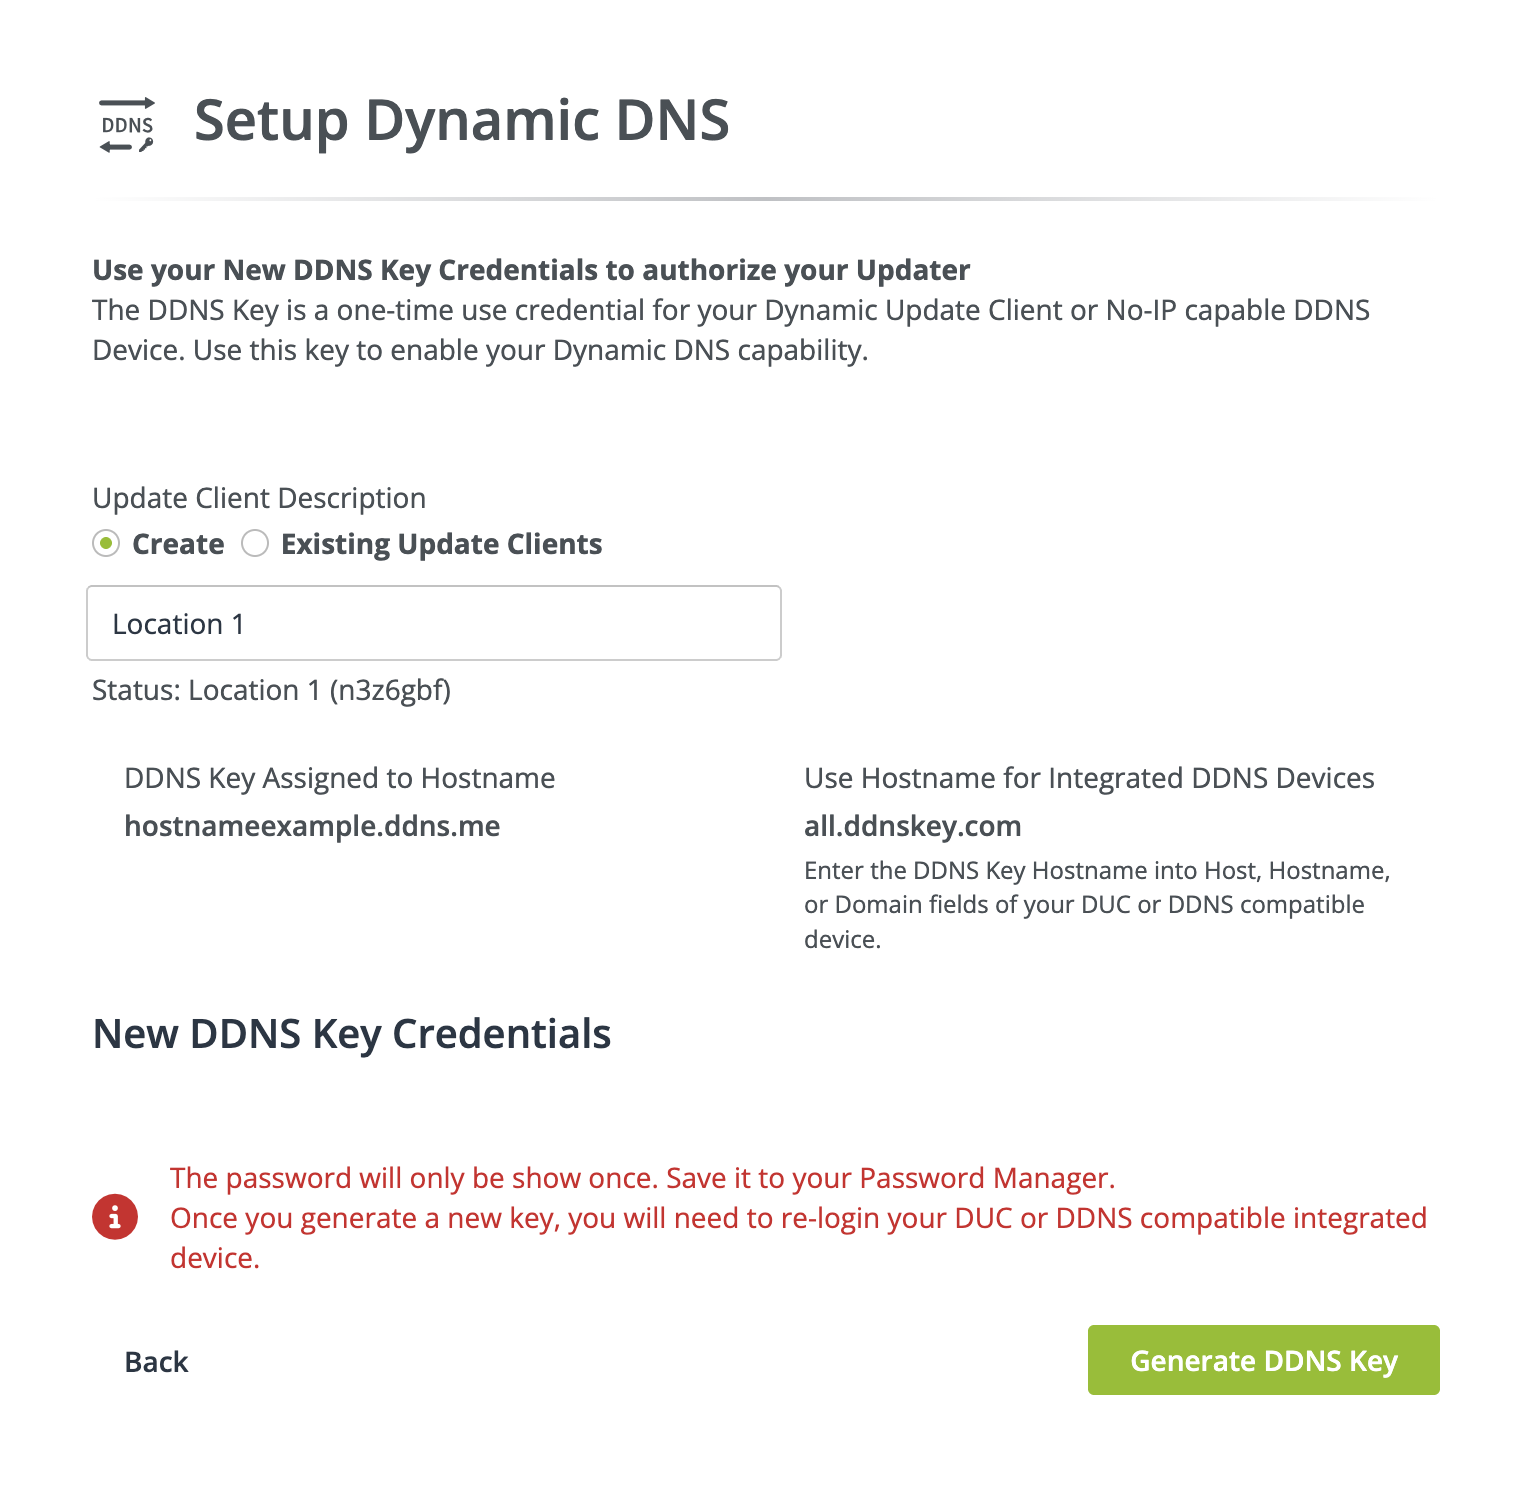
You should now see your DDNS Key Username and DDNS Key Password. This is your only opportunity to copy or save the DDNS Key password.
Configuring Dynamic DNS on Your Network
Setting up Dynamic DNS requires access to a device that physically exists at the remote network and can be done in one of two ways.
- Our Dynamic Update Client (DUC) can be downloaded on Windows, Mac, or Linux.
- Using a device that supports No-IP. Routers, cameras, DVRs and most other devices that can be accessed remotely support our Dynamic DNS service.
PC Setup
- Download and install our client on either Windows or Mac.
- Install and run the application.
- Enter your DDNS Key username and DDNS Key password.
- Select the checkbox adjacent to “all.ddnskey.com”.
If you plan to use the Linux client, you can follow our Linux installation instructions.
Router or Other Device Setup
- Log into your device. The manufacturer of your chosen device should have provided you with instructions on how to do so. If you lack instructions, check out our Configuring DDNS on a Router guide for some suggestions.
- Search for Dynamic DNS or DDNS settings. They are typically found under the “Advanced” options. DDNS settings differ depending on the device, but will typically contain the following fields:
DDNS Provider: No-IP
Username: Your DDNS Key Username / Email
Password: Your DDNS Key Password
Hostname/Domain: all.ddnskey.com
Server/Server Address: dynupdate.no-ip.com
Not every device will ask you for a server or server address. The service still works without issue if the device does not request it.
Fill in the fields with your own information and confirm your settings when finished.
Double Checking Your Configuration
The IP address on your selected hostname should match your public IP address. You can view your public IP address by checking our port check tool website while connected to the same network as the device being configured.
If the IPs do not match, double check the DDNS settings, check for any firmware updates, and ensure DDNS is Enabled.
Lastly, if your goal is establishing a remote connection to a device or a webpage, the next step is configuring Port Forwarding.
Two-Factor Authentication
We strongly recommend setting up Two-Factor Authentication to ensure your account is secure. This article will walk you through that process, step by step.
Need Help?
If you run into trouble, be sure to check the Support page of our website for helpful information, or contact support.