The purpose of this guide is to provide you with general instructions for configuring Plus Managed DNS.
With Plus, you can manage the DNS and use up to 5 DDNS clients for your own custom domain or sub-domains created against it. Plus Managed DNS requires your own custom domain. If you do not own a custom domain and would like to purchase one, please visit our domain registration page.
Zone Management
You must create a zone before creating DNS records or configuring Dynamic DNS on a custom domain. Zones are a space for DNS management of a domain name, in which DNS records for that domain can be created and managed.
Login to No-IP and navigate to Managed DNS > Zones. Click on the green Create Zone button.
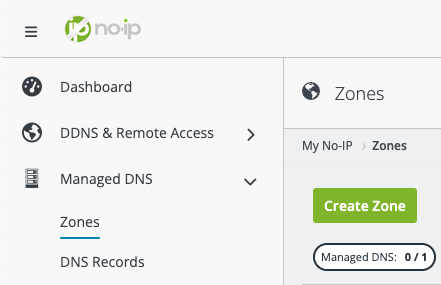
The following options should appear in the page:

You’ll want to enter in your domain name under the Zone Name field and click the Create button afterwards. *Please note that this does not register a domain name. You can only register domains on our domain registration page.
If you have reached your zone limit, you can upgrade the amount of available zones. To upgrade, check out our product page.
Hover over your domain’s zone and click on the more options icon that appears to the right.

Select Delete Zone. You can now create a zone for a different domain.
Nameservers
The next step is to change the nameservers for your domain.
To set the nameservers with No-IP:
- Login to No-IP and navigate to Domains.
- Click “Actions” to the right of your domain then “Configure“.
- At the bottom of the page you will see the nameservers that are currently set. They should match the No-IP nameserver list provided below. If they do not, click the nameserver set dropdown and select “No-IP Plus Defaults“.
- Confirm your changes by clicking on “Set Nameservers“
No-IP Nameservers:
NS1.NO-IP.COM
NS2.NO-IP.COM
NS3.NO-IP.COM
NS4.NO-IP.COM
If your domain is registered elsewhere, you will need to change the nameserver settings with your domain registrar.
Managing DNS Records
To create sub-domains or other DNS records:
- Login to No-IP.
- Click “Managed DNS“ on the left side of the page.
- Click “DNS Records“.
- Click the “Add Record” button to the right of the desired domain’s zone.
- Select your Hostname Type.
- Type in your hostname in the first field. Your domain should already fill the field next to it.
- Enter the IP Address/Target (Your current network’s IP address will be used automatically).
- You can select the available Time to Live or keep it set to auto. Most records should automatically set to the fastest available TTL.
- Optional: You can check Enable Dynamic DNS to create the hostname with a DDNS Key. You can create a hostname without it but it is recommend to set up Dynamic DNS.
- Click “Create“.
When Enable Dynamic DNS is selected during A record creation, you will be prompted with the Setup Dynamic DNS modal. Select the update client you plan to use, download a client if desired, then click Next.

Add an Update Client Description (Friendly Name) then click Generate DDNS Key.
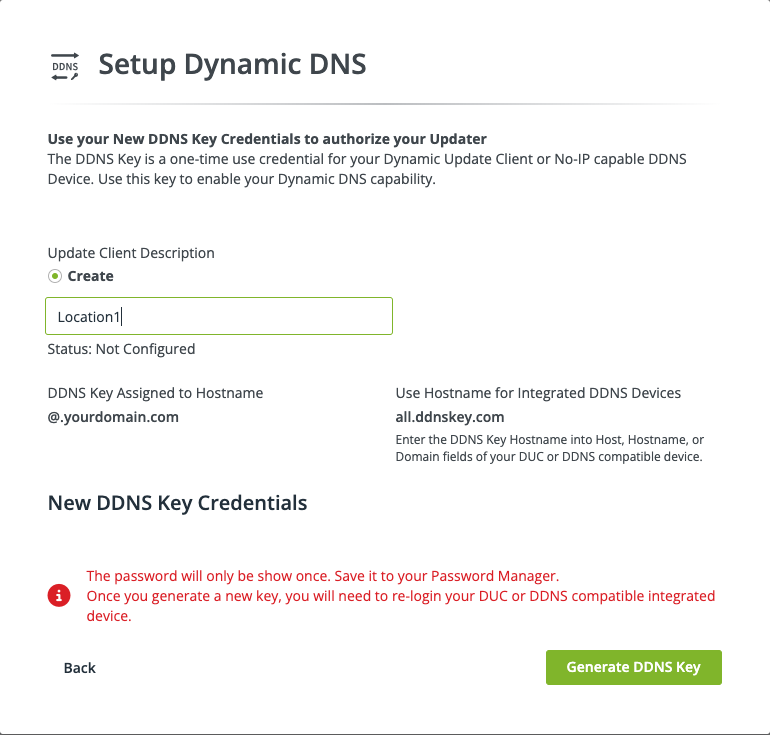
You should now see your DDNS Key Username and DDNS Key Password. This is your only opportunity to copy or save the DDNS Key Password.
To modify an existing DNS record:
- Login to No-IP.
- Click “Managed DNS” on the left side of the page.
- Click “DNS Records” and then on the desired domain/hostname you wish to modify.
Plus also allows you to create Advanced DNS records such as TXT, SRV, DKIM, etc. Here’s how:
- Login to No-IP.
- Click “Managed DNS” on the left side of the page.
- Click “DNS Records” and then the “Add Record” button to the right of your domain.
- Under the Type field you can scroll and select the following options available: TXT, SPF, DKIM, SRV, IPv6, CAA (most record types are added as TXT).
Setting Up DDNS
To setup DDNS you need configure an update client to send us your new IP address each time it changes with the DDNS key created when selecting Enable Dynamic DNS. For full instructions, check out our guide here. If you do not have a device that supports No-IP, you can download our software on Windows, Mac, or Linux instead. Lastly, port forwarding is required to resolve to a specific device like a camera, DVR, web server, etc.
If you need additional assistance, contact our support team.