If you have just purchased Enhanced Dynamic DNS, you might be wondering what you can do with it and how to do it. Hopefully this guide helps you achieve your goals whether you are a beginner or an expert.
Speaking of creating a hostname, we should get started there:
Creating A Hostname
To create a hostname, simply log into your No-IP account. Once you log in, you should see the ‘Quick Add’ option immediately:
Simply type the name of your new host into the ‘Hostname‘ field and then select the domain you want to add it to. You have your choice between our Free domains and Enhanced domains. ‘Record Type’ should be set to ‘A’ for the most part. You would only use the other types for redirects or load balancing.
Once you are done, click on ‘Add Hostname‘.
Modifying Your Hostname
To modify your hostname, you’ll want to click on ‘Dynamic DNS‘ on the left side of your account:
This will display all of your current hostnames. To modify a hostname, click on ‘Modify‘ next to the host you wish to edit:
In the ‘Modify‘ window that appears, you can manually set the IP address to whatever you want. You will also notice a Once you are done, click on ‘Update Hostname’ and that will save your changes. But what about that part of the window that says ‘MX Records‘?
Adding MX Records
You may have noticed when you create a hostname or when you modify one you already have, there is a field to enter an MX record:
MX records let other mail servers send you mail. If you have a mail server, you can enter that server’s hostname into the MX field, and set the priority of that record to the right. The lowest number gives the highest priority. You can have up to 5 MX records on a host. Just click the ‘+ Add MX Records‘ text and it will add one per click (up to 5, of course).
Keeping Your Hostname(s) Updated
This is perhaps the most important step. Keeping your hostnames updated at all times will ensure that we are always resolving your hostnames to the correct IP address. The fastest and most reliable way to achieve this is to download and install our Dynamic Update Client. You can download it by clicking on ‘Dynamic DNS‘ and then ‘Dynamic Update Client‘:
Click on the green ‘Download DUC‘ button and then follow the steps on that page to install and run it. Once you have confirmed your hostnames are being updated, you no longer need to worry about your hostname having an outdated IP address.
If you do not have a computer that is always running at that location, then you can generally find us in your wireless router’s DDNS settings or your DVR’s DDNS settings.
Here is the information you will need to set up DDNS on those devices:
DDNS Provider: No-IP
Username: Your DDNS Key Username / Email
Password: Your DDNS Key Password
Hostname/Domain: all.ddnskey.com
Server/Server Address: dynupdate.no-ip.com
Not every device will ask you for a server or server address. The service will still work without issue, if the device does not ask for it.
DDNS Key usernames and passwords are created individually for each hostname or group of hostnames. They are generated from the DNS Records page in your account.
Creating Advanced Records
Advanced records are records like TXT, SPF, DKIM, SRV, CAA. They are only available to accounts with Enhanced.
Follow these steps to create these records:
- Click on ‘Dynamic DNS‘ and then click ‘Personal Hostnames‘
- Click on ‘Modify‘ next to the hostname you want to add the record to:
From here, scroll down until you see ‘Advanced Records‘. It’s just above ‘Offline Options‘:
Click ‘TXT‘ to enter in your TXT record. If you would like help creating a proper SPF string for your TXT record, try our SPF Wizard. To create multiple text records quote each one with white space or carriage returns in between. For example: “record 1” “record 2“. Once you are done, click on ‘Update‘ and that will save the record.
Note: If you need to setup a Domain Key record (DKIM) please use this link to our DKIM Manager. DO NOT enter the domain key string into the text field on this page.
Increasing Hostname Limit
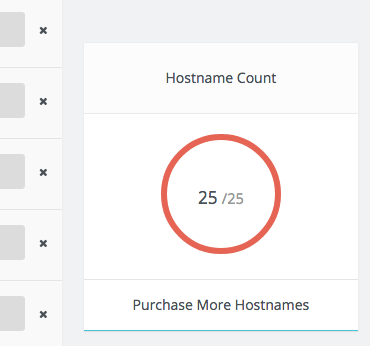
What’s that? You can’t stop creating hostnames, and need more? It happens. Luckily upgrading is easier than ever. Simply click on the ‘Purchase More Hostnames‘ button on the right side of your account page:
Select the amount you wish to upgrade to from the drop down menu and then click ‘Upgrade‘. You’ll be guided through the checkout process to finalize the upgrade. After that, enjoy all the new hostnames you get to play around with!
Where to Find Your SSL
Our Enhanced DDNS comes with one No-IP Vital Encrypt DV SSL certificate. Once checkout is completed, your No-IP Vital Encrypt DV SSL certificate will be automatically added to your account.
You can find the No-IP Vital Encrypt DV SSL certificate in your No-IP account by clicking My Services at the left, then SSL Certificates. You will need to complete the SSL setup.
More information about SSLs, CSRs and common server types can be found in our Knowledge Base.
This pretty much covers how to create, modify, and update your Enhanced DDNS hostnames. If there is something you are curious about that is not covered in this guide, feel free to ask our Success Team by opening a ticket or by calling us.


